1. GraphQL 이란?
GraphQL은 하나의 API 호출로 여러 소스에서 데이터를 가져올 수 있는 API용 오픈 소스 쿼리 언어이다. 또한 기존 데이터를 사용하여 쿼리를 수행하는 서버 측 런타임 역할도 한다.
1.1. 기존 REST API의 한계
1.1.1. 고정 구조 데이터 교환
REST API는 클라이언트 요청이 고정된 구조를 따라야 리소스를 수신할 수 있다. 이 엄격한 구조는 사용하기 쉽지만 필요한 데이터를 정확히 교환하기에 항상 가장 효율적인 수단인 것은 아니다.
1.1.2. 오버페칭 및 언더페칭
REST API는 항상 전체 데이터 세트를 반환한다. 예를 들어 REST API의 person 객체로부터는 그 사람의 이름, 생년월일, 주소 및 전화번호를 받게 된다. 전화번호만 있으면 이 모든 데이터를 얻을 수 있다.
마찬가지로, 개인의 전화번호와 마지막 구매 내역을 알려면 여러 개의 REST API 요청이 필요하게 된다. /person이라는 URL은 전화번호를 반환하고 /purchase라는 URL은 구매 내역을 반환한다.
이렇듯 불필요한 리소스를 가져오게 되므로 성능에 영향을 끼치게 된다.
1.2. GraphQL 은 어떻게 작동되는지?
GraphQL은 클라이언트에서 필요한 개체들을 쿼리로 서버에 요청하면 해당 쿼리는 검증된 후 스키마 기반으로 실행된다. 그리고 해당되는 리졸버 함수가 값을 생성하게 된다.
정리하자면, 클라이언트에서는 백엔드와 협의된 스키마를 기반으로 쿼리를 구성하고 요청한다.
위의 전화번호와 구매 내역을 예로 들자면,
query {
	getPerson(1) {
            name
            phoneNumber
            purchase {
                id
            }
    }
}
getPerson의 id가 1에 해당하는 유저를 가져오지만, 전화번호나 구매내역을 따로 구성하지 않고도 스키마가 정의되어 있다면 가져올 수 있게 된다.
기존의 REST API처럼 person, phoneNumber, purchase 세 번의 api를 호출하지 않아도 되게 된다.
1.3. GraphQL 핵심 용어
- 스키마
- API 개발자가 클라이언트가 어떤 데이터를 쿼리할 수 있는지 보여주기 위해 만든 스키마는 클라이언트가 요청할 수 있는 내용을 정의하는 개체 유형과 개체의 특성을 나타내는 필드로 구성됩니다.
- 쿼리
- 쿼리는 검증된 후 스키마를 기반으로 실행됩니다. GraphQL은 객체 유형을 정의하지 않고는 쿼리를 실행할 수 없습니다.
- Resolver
- 각 스키마 필드에 연결된 Resolver 함수는 API 실행에서 값을 생성하기 위해 호출됩니다. 리졸버는 GraphQL의 중요한 아키텍처 구성 요소입니다.
1.4. Rest와 GraphQL의 차이점 요약
| REST | GraphQL | |
| 정의 | REST는 클라이언트와 서버 간의 정형 데이터 교환을 정의하는 일련의 규칙입니다. | GraphQL은 API를 생성하고 조작하기 위한 쿼리 언어, 아키텍처 스타일 및 도구 세트입니다. |
| 적합한 용도 | REST는 리소스가 잘 정의된 간단한 데이터 소스에 적합합니다. | GraphQL은 크고 복잡하며 서로 연관된 데이터 소스에 적합합니다. |
| 데이터 액세스 | REST에는 리소스를 정의하는 URL 형태의 여러 엔드포인트가 있습니다. | GraphQL에는 단일 URL 엔드포인트가 있습니다. |
| 반환된 데이터 | REST는 서버가 정의한 고정된 구조로 데이터를 반환합니다. | GraphQL은 클라이언트가 정의한 유연한 구조로 데이터를 반환합니다. |
| 데이터 구조 및 정의 방법 | REST 데이터는 형식이 약하게 지정됩니다. 따라서 클라이언트는 형식이 지정된 데이터를 반환할 때 해석하는 방법을 결정해야 합니다. | GraphQL 데이터는 엄격하게 형식이 지정됩니다. 따라서 클라이언트는 미리 결정되고 상호 이해되는 형식으로 데이터를 수신합니다. |
| 오류 검사 | REST를 사용할 경우 반환된 데이터가 유효한지 클라이언트가 확인해야 합니다. | GraphQL을 사용하면 잘못된 요청이 일반적으로 스키마 구조에 의해 거부됩니다. 그 결과 오류 메시지가 자동으로 생성됩니다. |
2. GraphQL 패키지 설치
npm install @nestjs/graphql @nestjs/apollo @apollo/server graphql

yarn add @nestjs/graphql @nestjs/apollo @apollo/server graphql
3. GraphQL 모듈 설정
import { GraphQLModule } from '@nestjs/graphql';
import { ApolloDriver, ApolloDriverConfig } from '@nestjs/apollo';
import { join } from 'path';

@Module({
  imports: [
    GraphQLModule.forRoot<ApolloDriverConfig>({
      driver: ApolloDriver,
      autoSchemaFile: join(process.cwd(), 'src/schema.gql'), // 스키마 파일 생성 경로
      sortSchema: true, // 스키마를 알파벳 순으로 정렬 (선택 사항)
      playground: true, // 개발 환경에서 GraphQL Playground 활성화
      debug: true, // 개발 환경에서 디버그 정보 활성화
    }),
autoSchemaFile
코드 퍼스트(Code-First) 방식을 사용할 때, TypeScript로 정의한 @ObjectType(), @Field() 등을 바탕으로 GraphQL SDL(schema definition language) 파일을 자동 생성해 준다.
sortSchema
생성된 SDL 파일 내의 type, input, enum 등의 정의 순서를 알파벳 순(사전식)으로 정렬해 준다.
playground
GraphQL 쿼리/변경 요청을 손쉽게 테스트할 수 있는 GraphQL Playground UI를 활성화한다.
debug
GraphQL 실행 중 발생하는 에러나 경고에 대한 디버그 정보를 콘솔(또는 클라이언트)로 출력한다.
4. GraphQL 스키마 설정
import { IsString } from 'class-validator';
import { BaseModel } from 'src/common/entity/base.entity';
import { ImageModel } from 'src/common/entity/image.entity';
import { stringValidationMessage } from 'src/common/validation-message/string-validation.message';
import { UsersModel } from 'src/users/entity/users.entity';
import { Column, Entity, Index, JoinColumn, ManyToOne, OneToMany, RelationId } from 'typeorm';
import { CommentsModel } from '../comments/entity/comments.entity';
import { Field, ObjectType } from '@nestjs/graphql';

@ObjectType()
@Entity()
export class PostsModel extends BaseModel {

  @Field(() => UsersModel)
  @ManyToOne(() => UsersModel, (user) => user.posts, {
    nullable: false,
  })
  @JoinColumn( {name: 'authorId'})
  author: UsersModel;

  @Field(() => Number)
  @Column()
  @Index('idx_post_author_id')
  @RelationId((post: PostsModel) => post.author)
  authorId: number;

  @Field()
  @Column()
  @IsString({
    message: stringValidationMessage,
  })
  title: string;

  @Field()
  @Column()
  @IsString({
    message: stringValidationMessage,
  })
  content: string;

  @Field(() => Number)
  @Column({
    default: 0,
  })
  likeCount: number;

  @Field(() => Number)
  @Column({
    default: 0,
  })
  commentCount: number;

  @OneToMany(() => ImageModel, (image) => image.post)
  images: ImageModel[];

  @OneToMany(() => CommentsModel, (comment) => comment.post)
  comments: CommentsModel[];
}
import { Field, ID, ObjectType } from "@nestjs/graphql";
import { CreateDateColumn, PrimaryGeneratedColumn, UpdateDateColumn } from "typeorm";
@ObjectType()
export abstract class BaseModel {
@Field(() => ID)
@PrimaryGeneratedColumn()
id: number;
@Field()
@UpdateDateColumn()
updatedAt: Date;
@Field()
@CreateDateColumn()
createdAt: Date;
}GraphQL 의 스키마로 사용하고 싶은 Entity와 필드에 @ObjectType(), @Field() 데코레이터를 붙여준다.
5. 리졸버 생성
import { Resolver, Query, Args, Int } from '@nestjs/graphql';
import { PostsModel } from '../entity/posts.entity';
import { PostsService } from '../posts.service';

@Resolver(() => PostsModel)
export class PostsResolver {
  constructor(private readonly postsService: PostsService) {}

  @Query(() => PostsModel, { nullable: true }) // 단일 게시물 조회
  getPost(@Args('id', { type: () => Int }) id: number): Promise<PostsModel | null> {
    // PostsService를 사용하여 ID로 게시물 조회 로직 구현
    return this.postsService.getPostById(id);
  }
}
GraphQL은 REST와 다르게 Controller라는 이름이 아닌 Resolver라는 이름의 API 호출 아키텍처를 사용한다.
기존에 만들어두었던 PostsService의 로직을 가져와서 사용할 수 있으나, 다른 점은 쿼리기반으로 메서드가 작동해야한다는 것이다.
그러기 위해 @Query와 @Args 를 받아 사용한다.
6. 모듈에 리졸버 등록
import { Module } from '@nestjs/common';
import { PostsService } from './posts.service';
import { PostsController } from './posts.controller';
import { TypeOrmModule } from '@nestjs/typeorm';
import { PostsModel } from './entity/posts.entity';
import { AuthModule } from 'src/auth/auth.module';
import { UsersModule } from 'src/users/users.module';
import { CommonModule } from 'src/common/common.module';
import { ImageModel } from 'src/common/entity/image.entity';
import { PostsImagesService } from './image/images.service';
import { PostsResolver } from './resolver/posts.resolver';

@Module({
  imports: [
    TypeOrmModule.forFeature([
      PostsModel,
      ImageModel,
    ]),
    AuthModule,
    UsersModule,
    CommonModule,
  ],
  controllers: [PostsController],
  providers: [PostsService, PostsImagesService, PostsResolver],
  exports: [PostsService],
})
export class PostsModule {}
PostsModule에선 리졸버를 사용하기 위해 providers에 PostsResolver를 등록한다.
7. 토큰 가드에 예외처리
import { CanActivate, ExecutionContext, Injectable, UnauthorizedException } from "@nestjs/common";
import { AuthService } from "../auth.service";
import { UsersService } from "src/users/users.service";
import { Reflector } from "@nestjs/core";
import { IS_PUBLIC_KEY } from "src/common/decorator/is-public.decorator";
import { IsPublicEnum } from "src/common/const/is-public.const";
import { GqlExecutionContext } from "@nestjs/graphql";

@Injectable()
export class BearerTokenGuard implements CanActivate {
    constructor(
        protected readonly authService: AuthService,
        protected readonly usersService: UsersService,
        protected readonly reflector: Reflector,
    ) {}

    async canActivate(context: ExecutionContext): Promise<boolean> {
        const isPublic = this.reflector.getAllAndOverride(IS_PUBLIC_KEY, [
            context.getHandler(),
            context.getClass(),
          ]);

          if (isPublic) {
            return true;
          }

        // GraphQL 요청인지 확인하고, 맞다면 GqlExecutionContext 사용
        const gqlContext = GqlExecutionContext.create(context);
        const req = gqlContext.getContext().req || context.switchToHttp().getRequest(); // GraphQL 컨텍스트에서 req 가져오기, 없으면 HTTP 컨텍스트 시도

        if (!req) {
            // 요청 객체를 가져올 수 없는 경우 (예상치 못한 상황)
            throw new UnauthorizedException('Request object not found in context.');
        }

        const rawToken = req.headers['authorization']; // 여기서 req.headers 접근

        if (!rawToken) {
            throw new UnauthorizedException('토큰이 없습니다!');
        }

        const token = this.authService.extractTokenFromHeader(rawToken, true);
        const result = await this.authService.verifyToken(token);
        const user = await this.usersService.getUserByEmail(result.email);

        // req에 user 정보 주입 (GraphQL 컨텍스트와 HTTP 컨텍스트 모두에)
        if (gqlContext.getContext().req) {
            gqlContext.getContext().req.user = user;
            gqlContext.getContext().req.token = token;
            gqlContext.getContext().req.tokenType = result.type;
        } else {
            req.user = user;
            req.token = token;
            req.tokenType = result.type;
        }

        return true;
    }
}

@Injectable()
export class AccessTokenGuard extends BearerTokenGuard {
    async canActivate(context: ExecutionContext): Promise<boolean> {
        // 1. 현재 경로가 @IsPublic으로 지정되었는지 확인 (BearerTokenGuard와 동일한 방식)
        const isPublic = this.reflector.getAllAndOverride<IsPublicEnum>(IS_PUBLIC_KEY, [
            context.getHandler(),
            context.getClass(),
        ]);

        if (isPublic === IsPublicEnum.IS_PUBLIC) {
            // 공개 경로이면 AccessTokenGuard도 즉시 통과
            return true;
        }

        // 2. 공개 경로가 아니라면, BearerTokenGuard의 로직 실행
        // (토큰 추출, 기본 검증. 실패 시 BearerTokenGuard에서 예외 발생)
        await super.canActivate(context);

        // 3. BearerTokenGuard가 성공적으로 완료되었다면, req 객체를 올바르게 가져옴
        const gqlContext = GqlExecutionContext.create(context);
        const req = gqlContext.getContext().req || context.switchToHttp().getRequest();

        if (!req) {
            // 이 경우는 super.canActivate()가 req를 설정하지 않았거나, 컨텍스트에서 req를 찾을 수 없는 예외적 상황
            throw new UnauthorizedException('Request object not found in AccessTokenGuard.');
        }

        if (!req.tokenType) {
            // BearerTokenGuard에서 tokenType을 설정해야 함
            throw new UnauthorizedException('Token type not found on request.');
        }

        if (req.tokenType !== 'access') {
            throw new UnauthorizedException('Access Token이 아닙니다.');
        }

        return true;
    }
}

@Injectable()
export class RefreshTokenGuard extends BearerTokenGuard {
    async canActivate(context: ExecutionContext): Promise<boolean> {
        const isPublic = this.reflector.getAllAndOverride<IsPublicEnum>(IS_PUBLIC_KEY, [
            context.getHandler(),
            context.getClass(),
        ]);

        // Refresh 토큰 경로는 일반적으로 공개되지 않으므로, 이 조건은 거의 해당되지 않을 수 있습니다.
        if (isPublic === IsPublicEnum.IS_PUBLIC) {
            return true;
        }

        await super.canActivate(context);

        const gqlContext = GqlExecutionContext.create(context);
        const req = gqlContext.getContext().req || context.switchToHttp().getRequest();

        if (!req) {
            throw new UnauthorizedException('Request object not found in RefreshTokenGuard.');
        }

        if (!req.tokenType) {
            throw new UnauthorizedException('Token type not found on request.');
        }

        if (req.tokenType !== 'refresh') {
            throw new UnauthorizedException('Refresh Token이 아닙니다.');
        }

        return true;
    }
}
또한 REST의 req와 GraphQL의 req는 각기 다르므로, JWT 토큰에 대한 처리도 수정해야 한다.
REST 통신에서의 req는 context.switchToHttp().getRequest() 이지만
GraphQL에서 req는 gqlContext.getContext().req 이다.
8. Log interceptor 수정
import {
    Injectable,
    NestInterceptor,
    ExecutionContext,
    CallHandler,
    Logger,
  } from '@nestjs/common';
import { GqlExecutionContext } from '@nestjs/graphql';
  import { Observable, tap } from 'rxjs';

  @Injectable()
  export class LogInterceptor implements NestInterceptor {
    private readonly logger = new Logger(LogInterceptor.name);

    intercept(context: ExecutionContext, next: CallHandler): Observable<any> {
      const now = new Date();

      // GraphQL 요청인지 확인하고, 맞다면 GqlExecutionContext 사용
      const gqlCtx = GqlExecutionContext.create(context);
      const info = gqlCtx.getInfo(); // GraphQL 요청의 경우 info 객체에서 정보 추출 가능
      const req = gqlCtx.getContext().req || context.switchToHttp().getRequest(); // 가드에서와 동일한 방식으로 req 객체 가져오기

      let requestInfo = 'Request - ';
      if (info && info.parentType && info.fieldName) { // GraphQL 요청인 경우
          requestInfo += `Type: ${info.parentType}, Field: ${info.fieldName}`;
          if (req && req.ip) { // req 객체가 있고 ip 정보가 있다면 추가
              requestInfo += `, IP: ${req.ip}`;
          }
      } else if (req) { // HTTP 요청인 경우 (기존 로직)
          const { method, originalUrl, ip } = req;
          requestInfo += `Method: ${method}, URL: ${originalUrl}, IP: ${ip}`;
      } else {
          requestInfo += 'Unknown request type';
      }

      console.log(`${requestInfo} - ${now.toLocaleString('kr')}`);

      return next.handle().pipe(
          tap(() => {
              // 응답 로깅 (필요한 경우)
              // GraphQL의 경우 응답 구조가 다를 수 있으므로, 응답 로깅 방식도 고려해야 합니다.
              // const res = gqlCtx.getContext().res || context.switchToHttp().getResponse();
              console.log(`Response - ${requestInfo} - ${new Date().toLocaleString('kr')} (Execution time: ${new Date().getMilliseconds() - now.getMilliseconds()}ms)`);
          })
      );
    }
  }
또한 LogInterceptor를 통해 로그를 확인하고 있다면, REST 통신에 맞게 호출되고 있으므로, 이 부분도 수정해야 한다.
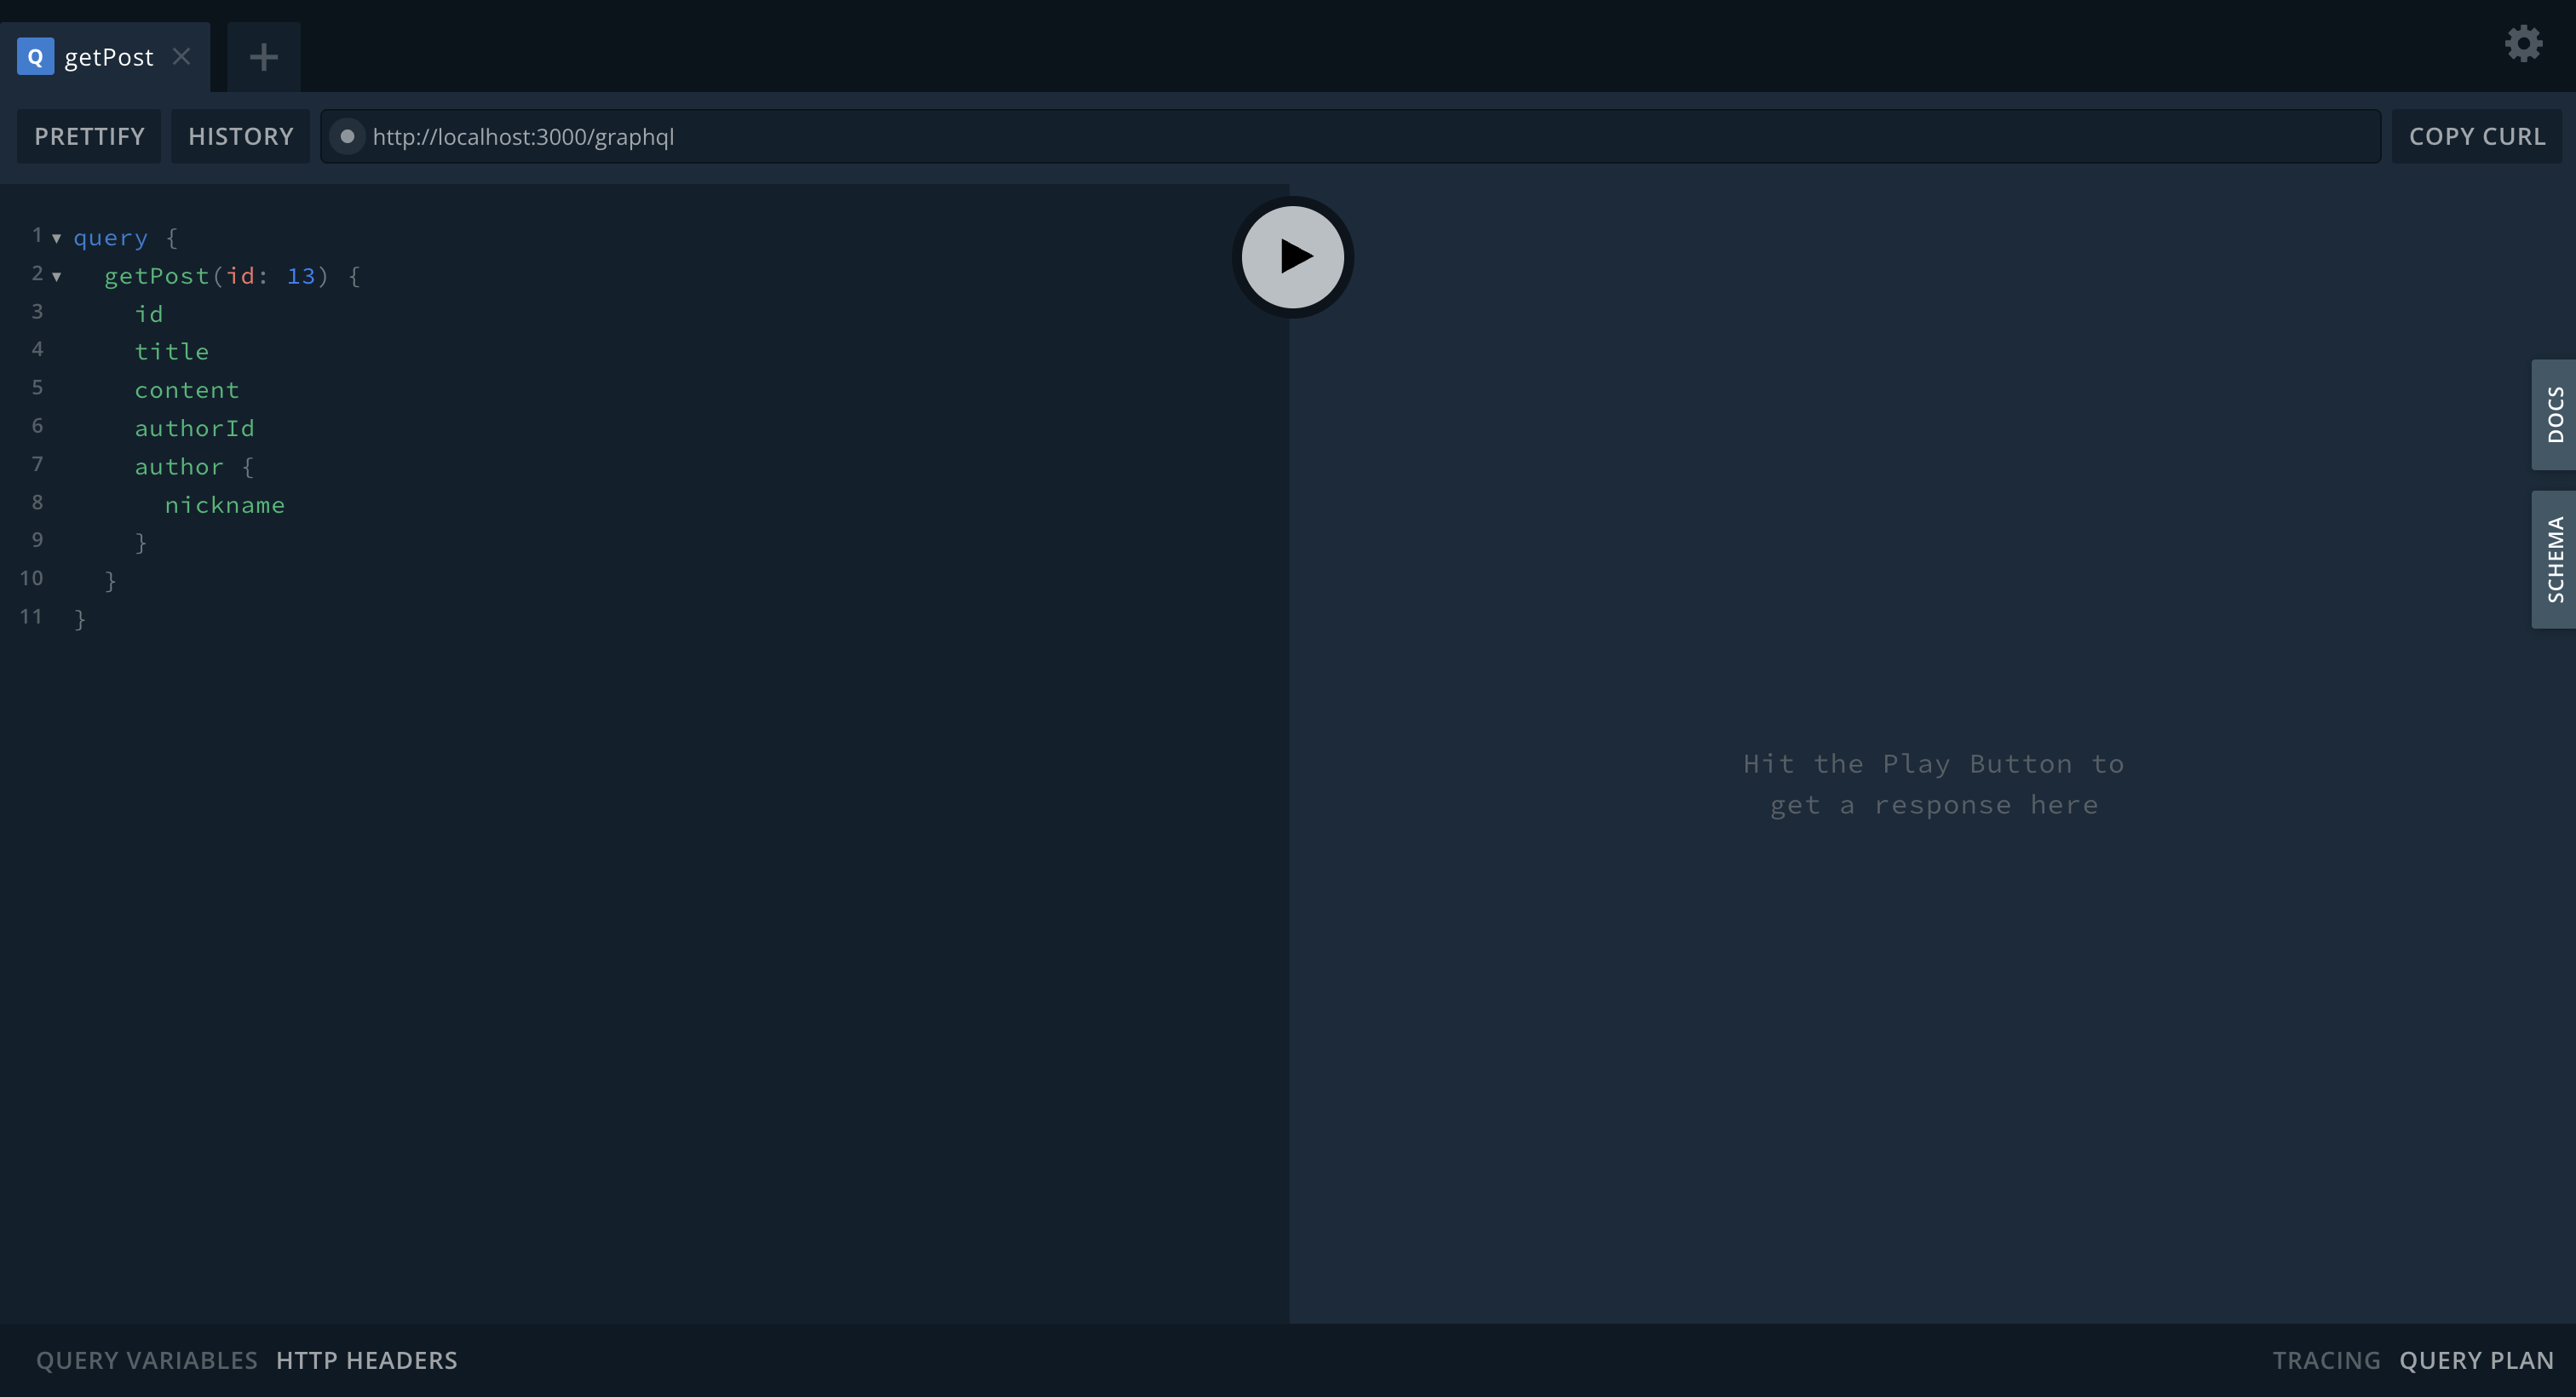
9. 웹 UI에서 확인하기

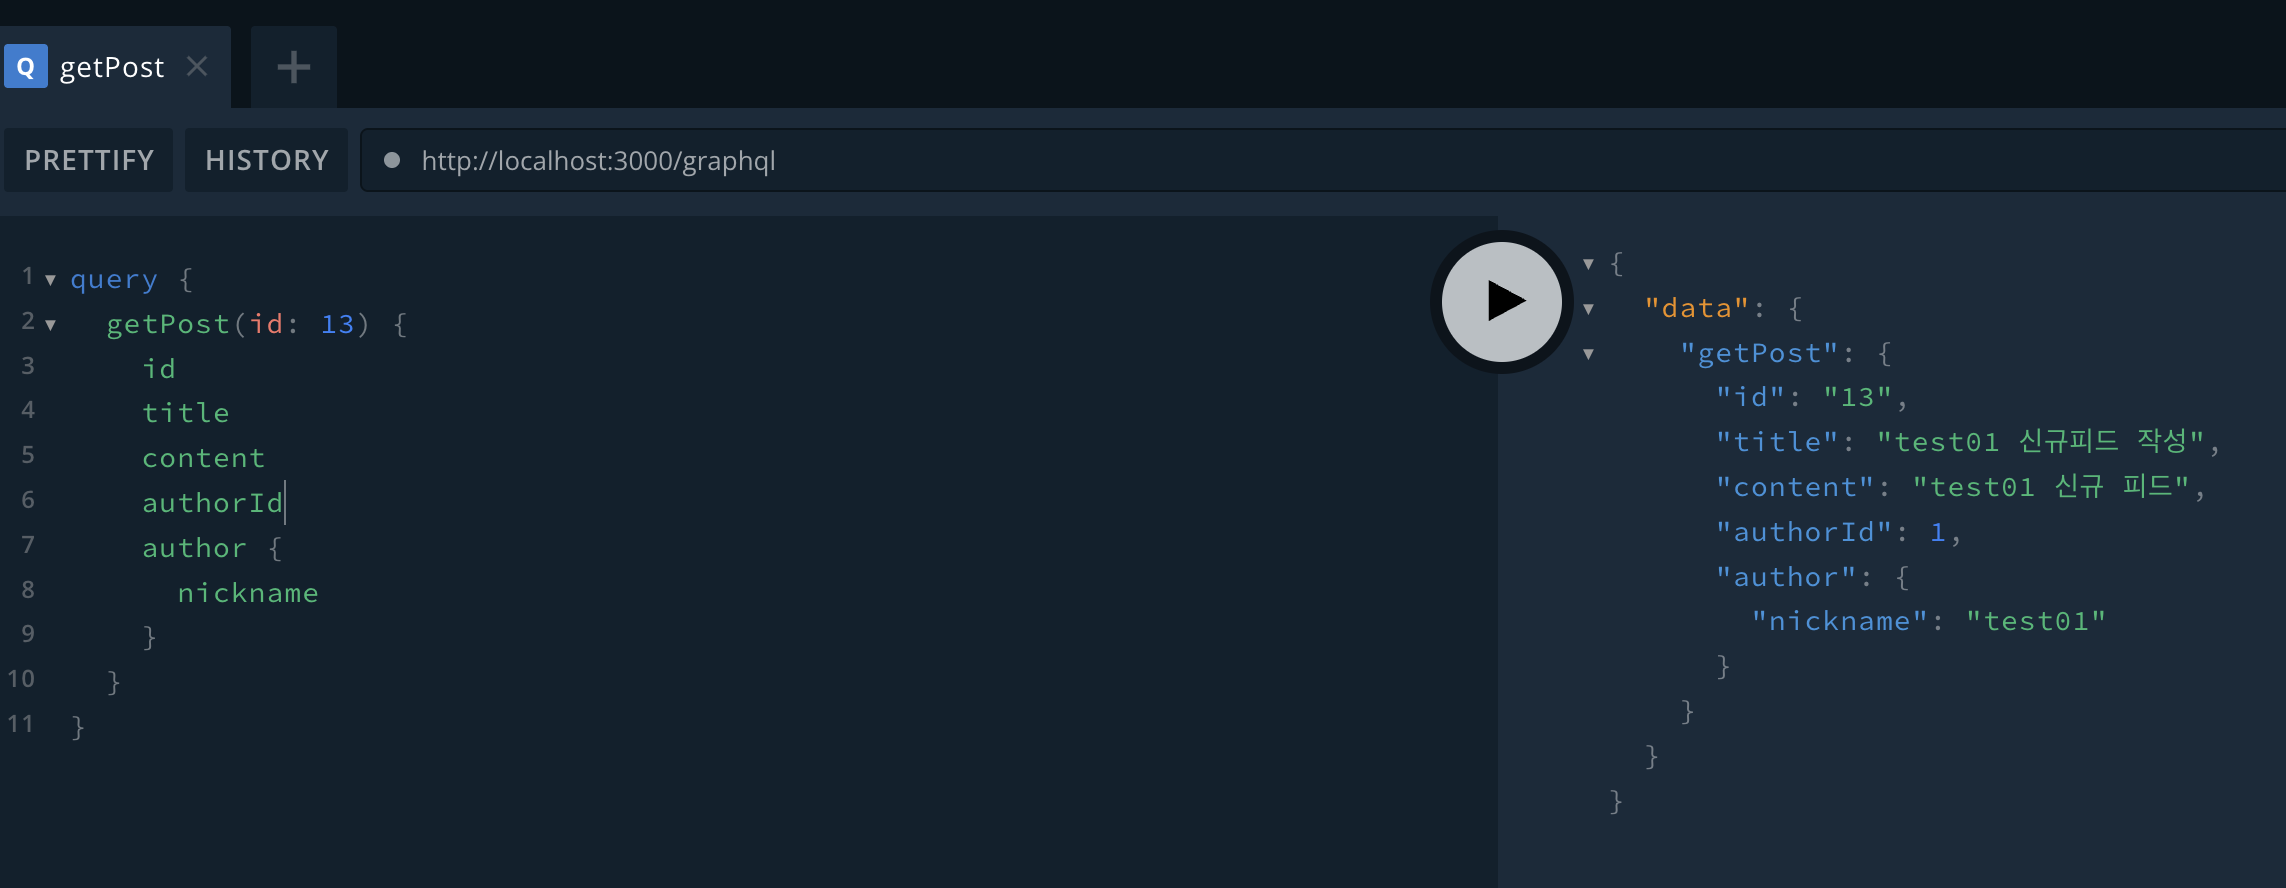
설정의 playground를 true로 설정했다면, UI에서도 쿼리형태로 요청 시 원하는 데이터를 가져올 수 있다.
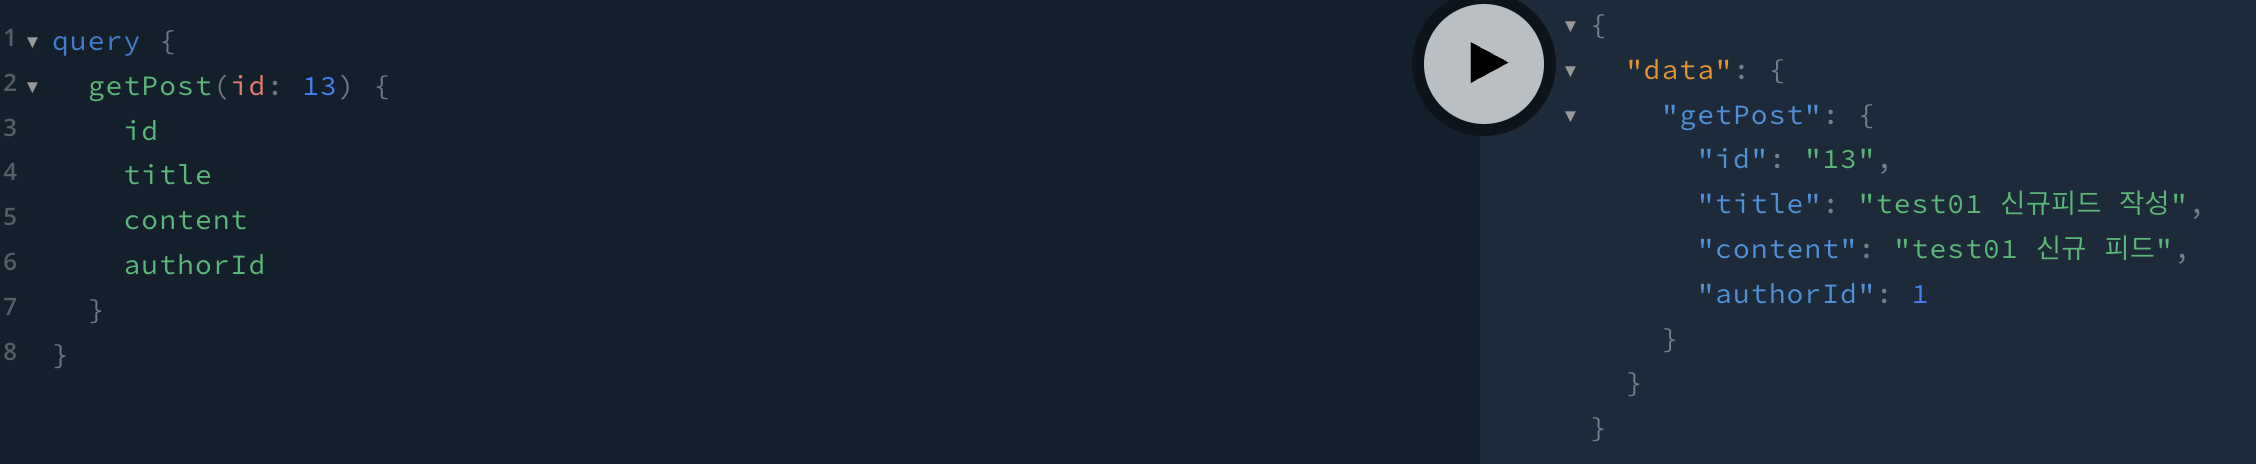
위와 다르게 author의 내용을 제외하고도 가져올 수 있다. 스키마에서 @Field()를 설정했다면 가능하다.
import { Resolver, Query, Args, Int } from '@nestjs/graphql';
import { PostsModel } from '../entity/posts.entity';
import { PostsService } from '../posts.service';
import { IsPublic } from 'src/common/decorator/is-public.decorator';
import { IsPublicEnum } from 'src/common/const/is-public.const';

@Resolver(() => PostsModel)
export class PostsResolver {
  constructor(private readonly postsService: PostsService) {}

  @Query(() => PostsModel, { nullable: true }) // 단일 게시물 조회
  @IsPublic(IsPublicEnum.IS_PUBLIC)
  getPost(@Args('id', { type: () => Int }) id: number): Promise<PostsModel | null> {
    // PostsService를 사용하여 ID로 게시물 조회 로직 구현
    return this.postsService.getPostById(id);
  }
}
참고로 리졸버에서 구성한 getPost와 UI에서 호출할 쿼리내의 호출명이 같아야하며, 리졸버의 메서드에는 @IsPublic으로 구성되어있어야 JWT 토큰 검증을 받지않고 실행할 수 있게 된다.
10. Postman에서 확인하기
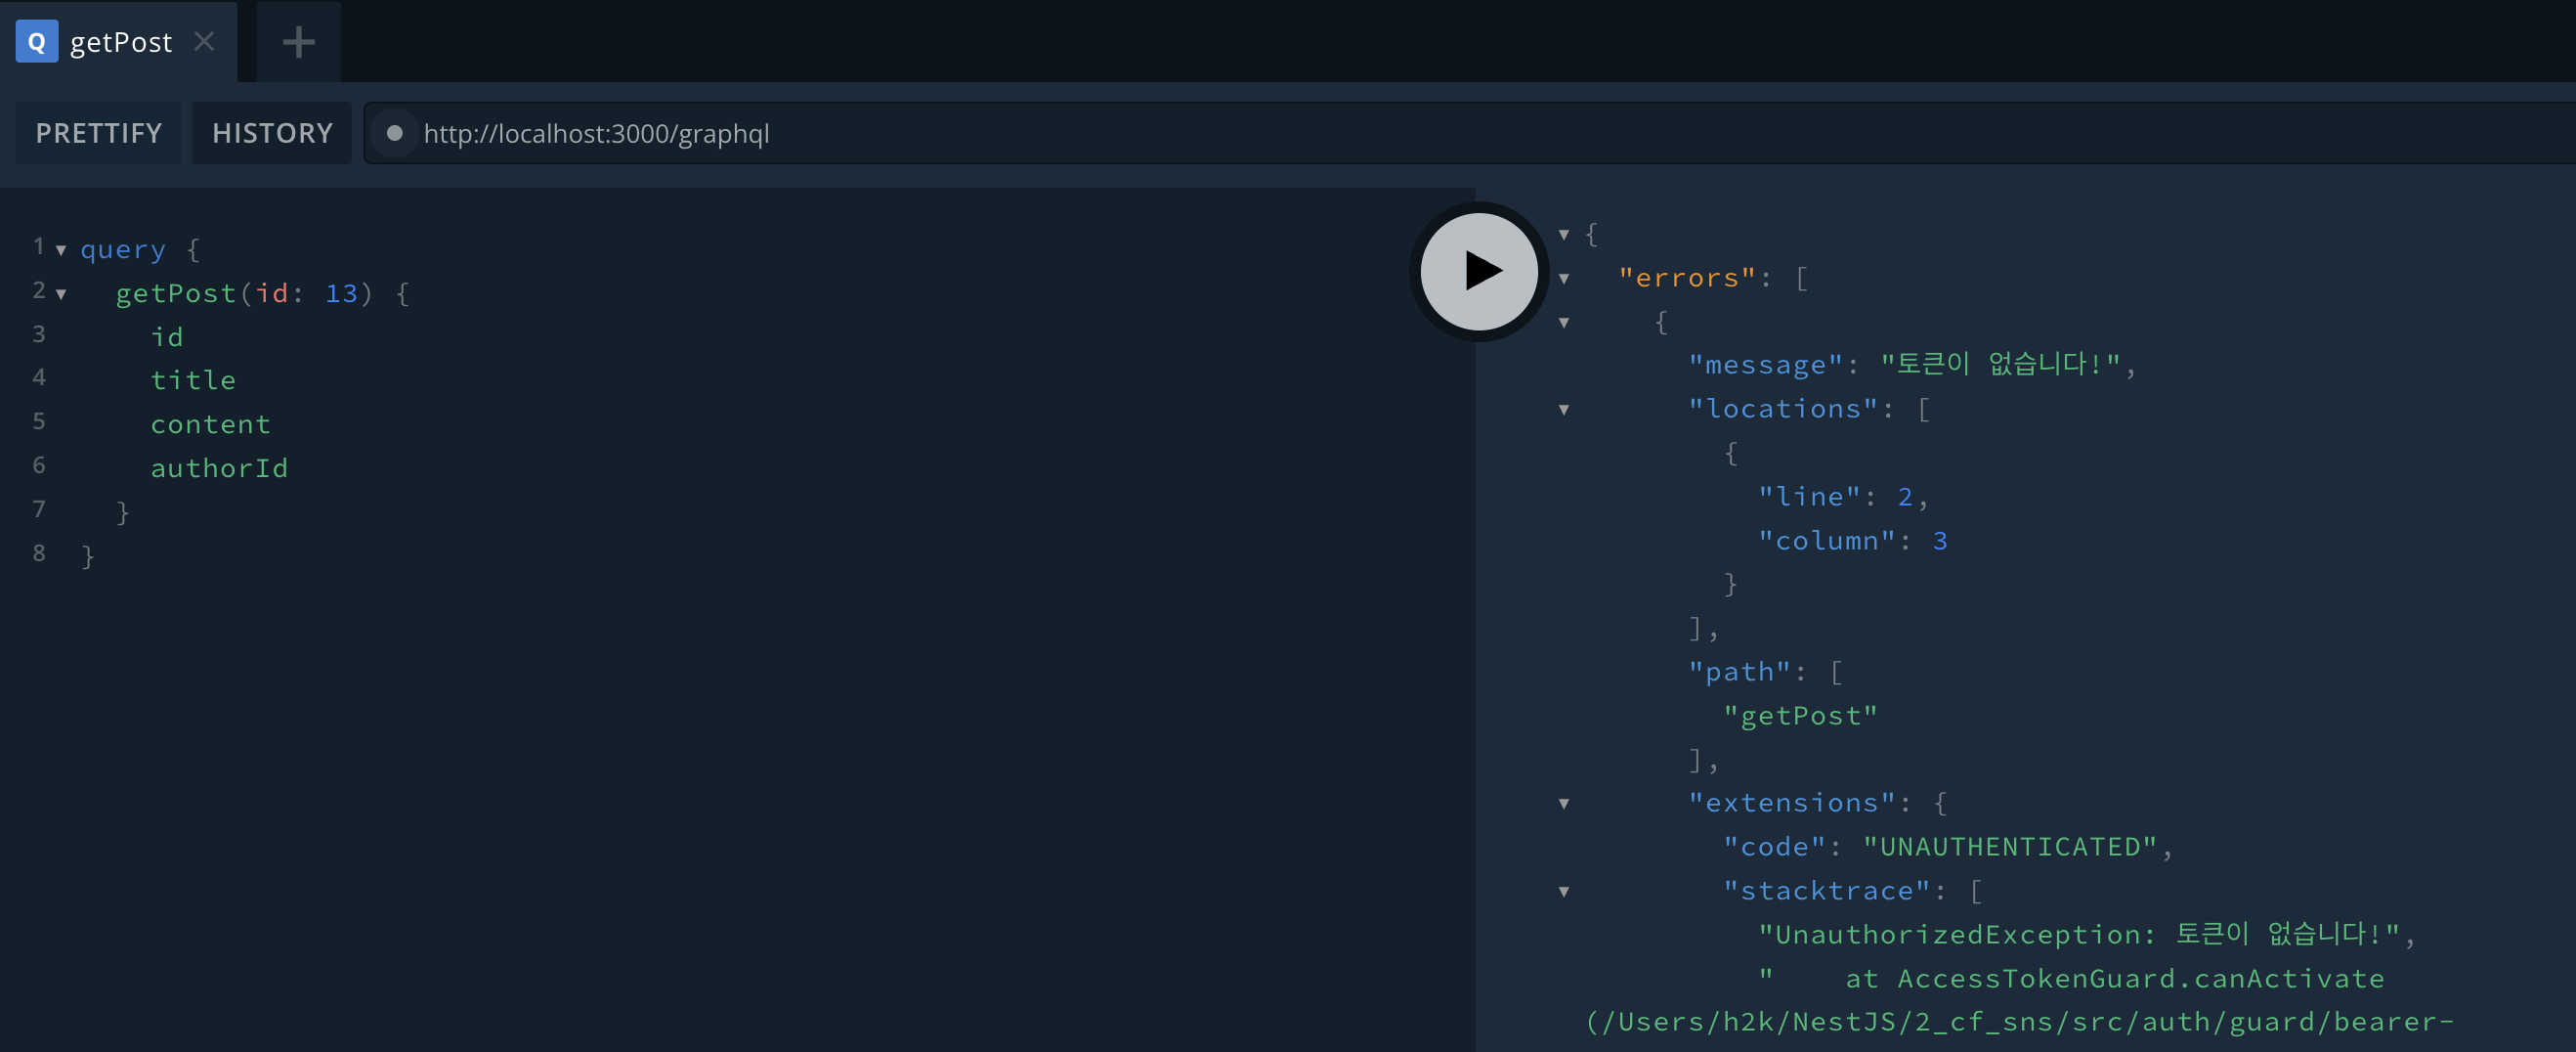
리졸버에서 @IsPublic을 하지 않는다면 토큰 검증에서 실패하여 에러가 발생한다.
프로모션에서는 토큰 검증이 필요한 경우가 있다. 이러한 경우 postman에서도 확인이 가능하다.
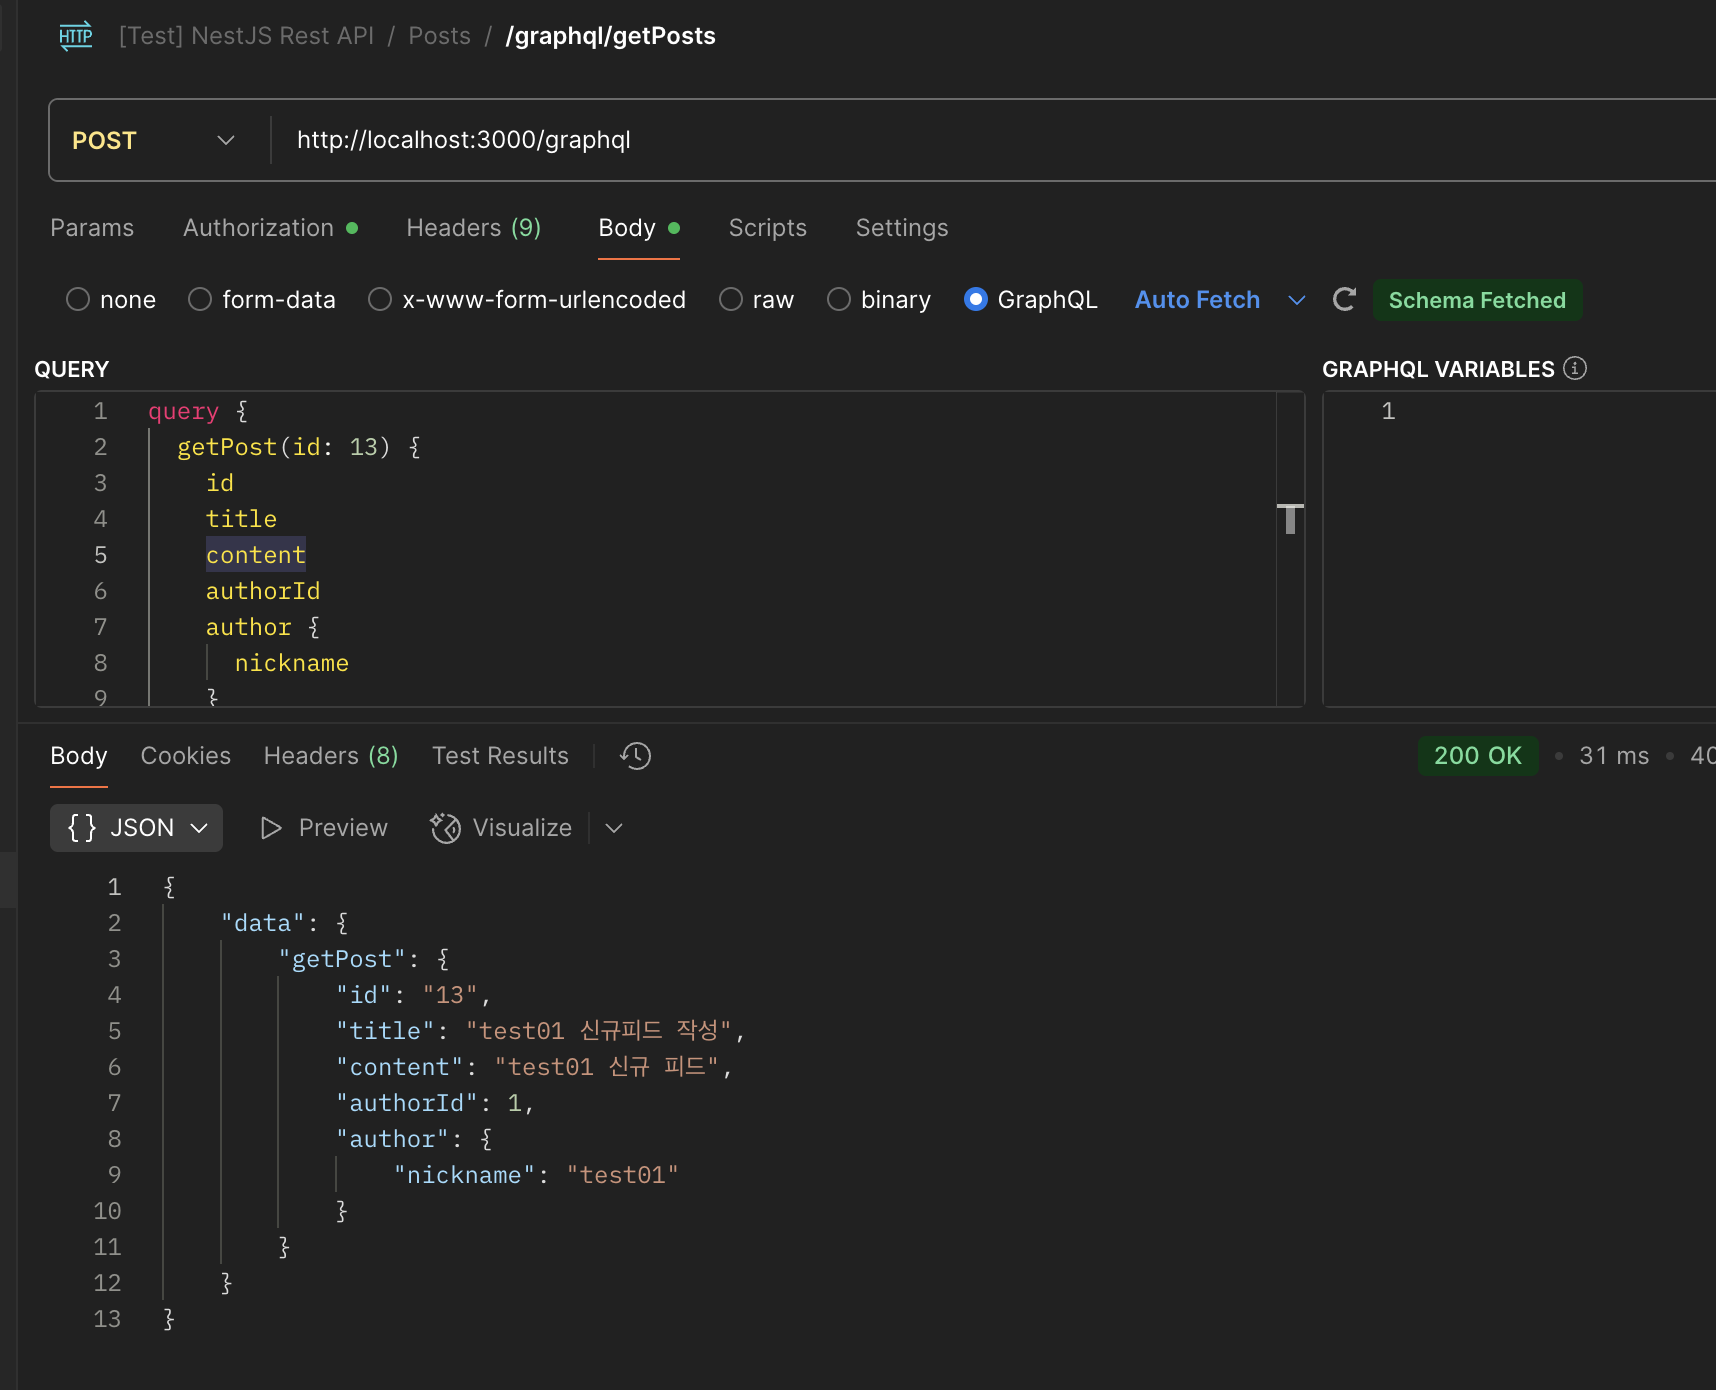
postman에서는 로그인 시 jwt 토큰이 유지되도록 이미 구현한바가 있다.
GraphQL은 통신이 무조건 POST로 진행되기 때문에, POST로 구성하고, Authorization을 구성한 뒤, Body에서 GraphQL로 진행하면 정상적으로 요청이 수행되는 것을 볼 수 있다.
'NestJS' 카테고리의 다른 글
| [NestJS] 자동 문서화 가이드 (Compodoc) (1) | 2025.05.30 |
|---|---|
| [NestJS] 각종 보안 적용하기 (0) | 2025.05.27 |
| [NestJS] DB 인덱싱 (0) | 2025.05.21 |
| [NestJS] 데이터 시딩 - 50만건 더미 데이터 추가하기 (0) | 2025.05.08 |
| [NestJS] Redis 적용하기 - Rate Limiting (0) | 2025.04.21 |


