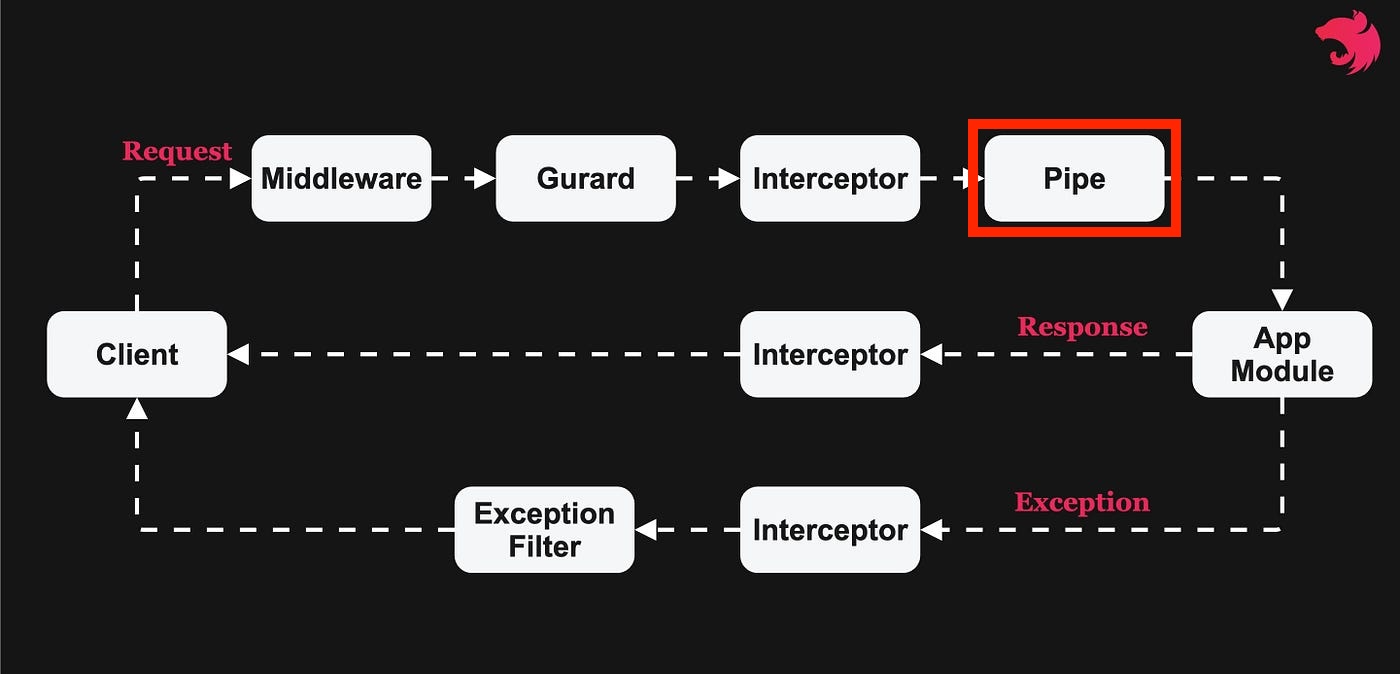
1. Pipe 란?
NestJS의 Pipe는 주로 요청 데이터의 변환(Transformation)과 유효성 검증(Validation)을 담당하는 기능이다. Pipe는 컨트롤러에 도달하기 전에 요청 데이터에 대해 전처리 작업을 수행하여, 데이터의 형식을 맞추거나 유효한지 검사한다.
정리하자면 클라이언트에서 서버로 보낸 요청 데이터를 먼저 변환하거나 검증하는 로직들을 의미한다.
2. 기본 Pipe 사용해보기
// 2) GET /posts/:id
  // id에 해당되는 post를 가져온다.
  @Get(':id')
  getPost(@Param('id') id: string) {
    return this.postsService.getPostById(+id);
  }
컨트롤러에서 유저 포스트를 가져오는 라우터를 위와 같이 만들었을 때, @Param은 클라이언트가 요청한 URL에서 id를 추출하여 가져오므로 string 값으로 가져오게 된다. 그것을 다시 로직 본문에서 id를 number로 변환하여 사용하고 있다.
// 2) GET /posts/:id
  // id에 해당되는 post를 가져온다.
  @Get(':id')
  getPost(@Param('id', ParseIntPipe) id: number) {
    return this.postsService.getPostById(id);
  }
ParseIntPipe를 @Param의 두 번째 파라미터로 넣고, id를 number로 변경하면 결과가 똑같이 수행된다.
export declare class ParseIntPipe implements PipeTransform<string> {
    protected readonly options?: ParseIntPipeOptions | undefined;
    protected exceptionFactory: (error: string) => any;
    constructor(options?: ParseIntPipeOptions | undefined);
    /**
     * Method that accesses and performs optional transformation on argument for
     * in-flight requests.
     *
     * @param value currently processed route argument
     * @param metadata contains metadata about the currently processed route argument
     */
    transform(value: string, metadata: ArgumentMetadata): Promise<number>;
    /**
     * @param value currently processed route argument
     * @returns `true` if `value` is a valid integer number
     */
    protected isNumeric(value: string): boolean;
}
이는 기본적으로 제공되는 ParseIntPipe가 내부적으로 number값으로 변경하기 때문이다.
3. Custom Pipe 작성하기
@Post('register/email')
  postRegisterEmail(
    @Body('nickname') nickname: string,
    @Body('email') email: string,
    @Body('password') password: string,
  ) {
    return this.authService.registerWithEmail({
      nickname,
      email,
      password,
    });
  }
위의 라우터는 nickname,email,password를 받아 회원가입하는 로직이다.
만약 password의 길이를 특정 구간의 길이일 경우에만 (예를 들어 최소3, 최대8) 가입이 허용되게 하려는 경우에도 Pipe를 이용할 수 있다.
import { PipeTransform, Injectable, ArgumentMetadata, BadRequestException } from '@nestjs/common';

@Injectable()
export class MaxLengthPipe implements PipeTransform {
    constructor(private readonly length: number,
        private readonly subject: string,
    ) {}

    transform(value: any, metadata: ArgumentMetadata) {
        if(value.toString().length > this.length) {
            throw new BadRequestException(`${this.subject}의 최대 길이는 ${this.length}입니다.`);
        }

        return value.toString();
    }
}

@Injectable()
export class MinLengthPipe implements PipeTransform {
    constructor(private readonly length: number,
        private readonly subject: string,
    ) {}

    transform(value: any, metadata: ArgumentMetadata) {
        if(value.toString().length < this.length) {
            throw new BadRequestException(`${this.subject}의 최소 길이는 ${this.length}입니다.`);
        }

        return value.toString();
    }
}
위와 같이 작성하면 굳이 Password가 아닌 길이와 관련된 다른 작업에도 최소, 최대 제한을 적용할 수 있다.
@Post('register/email')
  postRegisterEmail(
    @Body('nickname') nickname: string,
    @Body('email') email: string,
    @Body('password', new MaxLengthPipe(8, '비밀번호'), new MinLengthPipe(3, '비밀번호')) password: string,
  ) {
    return this.authService.registerWithEmail({
      nickname,
      email,
      password,
    });
  }
완성된 Pipe를 기존 라우터에 적용하여 길이를 제한할 수 있다.
'NestJS' 카테고리의 다른 글
| NestJS - Custom Decorator (0) | 2025.02.27 |
|---|---|
| NestJS - Guard (0) | 2025.02.27 |
| VSC 디버거 사용하기 (0) | 2025.02.26 |
| Authentication - 로직 구현 (0) | 2025.02.26 |
| Authentication - Encryption (암호화) (0) | 2025.02.26 |

